OSX で Raspberry Pi Pico / Arducam Mini 2MP Plus(OV2640 SPI Camera) から BMP 画像をキャプチャする
久々にこのあたりを触っており、上記タイトルのことをやってみたので投稿します。
Mac ユーザーは Arducam の画像キャプチャアプリを使えないので不便です。
python で簡単な確認スクリプトを作って BMP を確認してみました。
ちなみに、Arducam Mini 2MP Plus(OV2640 SPI Camera) はすでにディスコンのようで今後のことを考えるとあまり意味がないかもしれませんので、参考程度に。
www.arducam.com
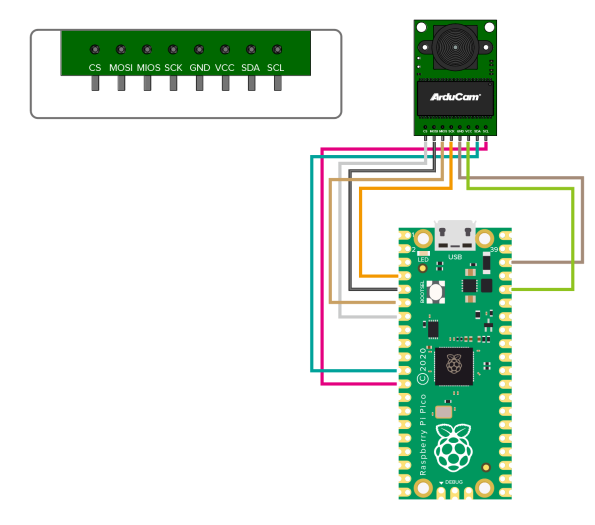
配線はこちらです
PICO_SPI_CAM/C/Examples/Arducam_MINI_2MP_Plus_Videostreaing/ をベースに変えていきます。 github.com
変更内容は以下の diff のとおりです。 CMakeLists.txt を変更するのを忘れないでください。
sdiff -s Arducam_MINI_2MP_Plus_Videostreaing/Arducam_MINI_2MP_Plus_Videostreaing.cpp Arducam_MINI_2MP_Plus_Videostreaming_BMP/Arducam_MINI_2MP_Plus_Videostreaming_BMP.cpp
  tusb_init();                                                |   //tusb_init();
                                                              >
                                                              >   // システムが起動仕切るのに時間がかかっている
                                                              >   sleep_ms(2000);
                                                              >
         //Change to JPEG capture mode and initialize the OV5 |         //Change to JPEG capture mode and initialize the OV56
  myCAM.set_format(JPEG);                                     |   /* myCAM.set_format(JPEG); */
                                                              >   /* myCAM.InitCAM(); */
                                                              >   /* myCAM.OV2640_set_JPEG_size(OV2640_320x240); */
                                                              >
                                                              >   // JPEG 設定で後で BMP に変えると、変な設定が残る(カラーピクセ
                                                              >   // (ArduCAM::InitCAM() あたりの initial 設定)
                                                              >   myCAM.set_format(BMP);
  myCAM.OV2640_set_JPEG_size(OV2640_320x240);                 |
        symbol[0]=0xff;                                       |         /* ビューワーアプリ側の仕様か BMP body の前後に 0xff 0xaa
        symbol[1]=0xaa;                                       |         /* symbol[0]=0xff; */
                                                              >         /* symbol[1]=0xaa; */
        SerialUsb(symbol, sizeof(symbol));                    |         /* SerialUsb(symbol, sizeof(symbol)); */
        symbol[0]=0xbb;                                       |         /* ビューワーアプリ側の仕様か BMP body の前後に 0xff 0xaa
        symbol[1]=0xcc;                                       |         /* symbol[0]=0xbb; */
        SerialUsb(symbol, sizeof(symbol));                    |         /* symbol[1]=0xcc; */
                                                              >         /* SerialUsb(symbol, sizeof(symbol)); */
}                                                             \ }
Python 側の受けはこちらで jupyter lab で組みました。取れた画像もつけておきます。

# serial communication with ARDUCAM
import serial
import array
import time
from PIL import Image
import numpy as np
from matplotlib import pylab as plt

'''
%ls /dev/tty.*
/dev/tty.Bluetooth-Incoming-Port  /dev/tty.usbmodem101
'''
COM = '/dev/tty.usbmodem101'

ser = serial.Serial(COM, 115200)
print(ser)
'''
Serial<id=0x7fcf800c5ae0, open=True>(port='/dev/tty.usbmodem101', baudrate=115200, bytesize=8, parity='N', stopbits=1, timeout=None, xonxoff=False, rtscts=False, dsrdtr=False)
True
'''

# timeout 1000msec
def rcv():
    for i in range(100):
        b_rep = ser.read_all()
        if len(b_rep) > 0:
            print(b_rep)
        time.sleep(0.01)

def snd_cmd(cmd):
    ser.write(cmd)
    ser.flush()
    rcv()

# Single shot - timeout 10sec
def single_shot_bmp():

    # single shot command
    ser.write(bytes([0x30]))
    ser.flush()

    resp = b""
    for i in range(10000):
        _resp = ser.read_all()
        if len(_resp) > 0:
            resp = b"".join([resp, _resp])
            if len(resp) >= 153737:
                break
        time.sleep(0.001)
        ser.flush()
    print(len(resp))

    return resp

# BMP 取得する

# 1. BMP にキャプチャフォーマットを変更
# Received 0x31(49)', b'ACK CMD SET FORMAT TO BMP.
snd_cmd(bytes([0x31]))

# 2. ワンショットキャプチャ - resp に全部入ってくる
resp = single_shot_bmp()

# 3. Response message に色々と入っているので、 BMP データ(Header 含む)はそれ以降のバイナリ配列
# b'Received 48ACK CMD CAM start single shoot. ENDACK CMD CAM Capture Done.'
print(resp[:71])

# (番外編)そのまま bmp にして保存すると色バランスがおかしい。
# カラーマスクがうまく働かないのかもしれない (ビューワー側の問題? - カラーマスクにしっかり対応したビューワーはあまりないとのこと)
pix = resp[71:]
with open('myfile2.bmp', 'wb') as f:
    f.write(pix)

'''
BMP HEADER なしで、カラーマスクを使って RGB を再現する
http://dencha.ojaru.jp/programs_07/pg_graphic_04.html

5-5-5
R 0x00007C00
G 0x000003E0
B 0x0000001F

5-6-5 ---> 今回はこっち
R 0x0000F800
G 0x000007E0
B 0x0000001F

色を取得するときは5-6-5なら
  R = (color & R_mask) >> 11;
  G = (color & G_mask) >> 5;
  B = (color & B_mask) >> 0;
'''

# BMP header をスキップし画素にアクセス
_pix = pix[66:]
print(len(_pix))

height = 240
width = 320
im = []
for h in range(0, height, 1):
    _im = []
    for w in range(0, width, 1):
        i = 2*(h*width+w)
        p = (_pix[i] << 8) | _pix[i+1]
        r = (p & R_mask) >> 11
        g = (p & G_mask) >> 5
        b = (p & B_mask)
        _im.append((r<<3, g<<2, b<<3))
    im.append(_im)
plt.imshow(im)